
For small business owners, handling inbound leads manually creates a major bottleneck. When prospective clients fill out a contact form or request a quote on your website, waiting hours to respond often means losing that deal to a faster competitor.
Studies consistently show that contacting a lead within five minutes increases your chances of qualifying them by over 400%. However, small teams rarely have the staff needed to monitor incoming lead forms around the clock.
This is where a custom AI lead generation workflow changes the game.
By connecting no-code automation platforms with natural language AI models, you can automatically capture incoming leads, enrich their business data, evaluate their fit score, and send personalized follow-up messages within seconds.
Here is your step-by-step technical guide to building an automated AI lead generation pipeline.
What Is an Automated AI Lead Workflow?
An automated AI lead workflow is an interconnected series of software triggers and API actions that processes incoming prospect data automatically. The workflow operates through five continuous nodes:
-
Webhook Trigger: Instantly receives new lead submissions from web forms or ad campaigns.
-
Data Enrichment Node: Cleans up text and appends missing company details.
-
AI Classification & Scoring: Passes lead data into an LLM API to evaluate ICP (Ideal Customer Profile) fit.
-
Conditional Router: Splits leads into “High Priority,” “Low Priority,” or “Disqualified” paths.
-
Action Node: Sends an immediate personalized email, alerts sales reps on Slack, or updates your CRM.
System Tech Stack Options
You do not need custom coding skills to build an AI lead generation pipeline. You simply need to pick an integration platform and pair it with an AI API.
| Platform Layer | Recommended Tools | Primary Function |
| Form Trigger | Typeform / Tally / Webflow Forms | Captures prospect details (Name, Email, Budget, Problem Statement). |
| Workflow Engine | Make (Integromat) / Zapier | Connects application endpoints, parses webhooks, and manages logic paths. |
| AI Intelligence | OpenAI API (GPT-4o) / Claude API | Scores lead quality, extracts intent, and drafts personalized outreach. |
| Database & CRM | HubSpot / Airtable / Notion | Stores structured lead records, fit scores, and conversation logs. |
| Notification | Slack / Twilio SMS / Gmail | Delivers instant alerts to your phone or team chat for hot leads. |
Review integration capabilities directly through the Make.com AI Sales Automation Guide and explore pre-built routing triggers inside the Zapier Lead Management Solutions Guide.
Step 1: Set Up Your Webhook Trigger
Create a incoming Webhook module inside Make or Zapier. Copy the unique Webhook URL and paste it into your website form’s submission settings (e.g., Typeform or Webflow).
When a prospect submits their contact info, your workflow receives a JSON payload containing their name, email, company size, and project description.
Step 2: Configure the OpenAI Prompt Node
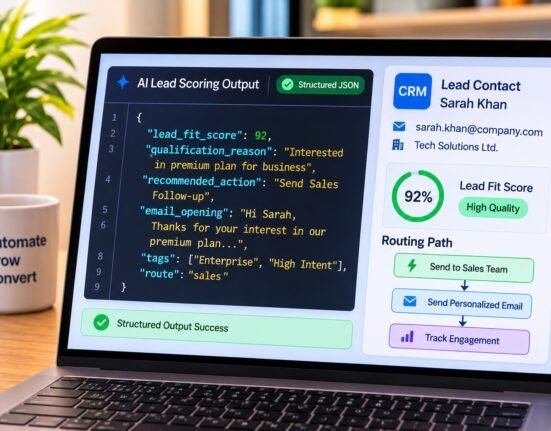
Add an API request module (or native OpenAI module) right after your Webhook trigger. Pass the lead’s form inputs directly into a structured system prompt:
Refer to the official OpenAI API Developer Documentation for details on JSON output modes and parameter tuning.
Step 3: Set Up Conditional Logic Routing
Add a Router module after your AI node:
-
Path A (Hot Lead – Fit Score >= 8):
-
Trigger an instant email via Gmail/Outlook using the AI-generated
personalized_introand your calendar booking link. -
Send a high-priority Slack/SMS notification to your sales rep with the lead’s contact details and AI reasoning.
-
-
Path B (Nurture Lead – Fit Score < 8):
-
Store the contact in your CRM (e.g., HubSpot or Airtable) tagged as “Nurture”.
-
Add the lead to a 60-day automated email educational newsletter.
-
Learn how to productize and resell automated client agency systems in our detailed guide on how to start a white label ai automation agency for local businesses.
Step 4: Test and Optimize Your Workflow
Before putting your automation live, run thorough end-to-end testing:
-
Test Edge Cases: Submit test form entries with missing fields, vague descriptions, or tiny budgets to ensure your AI router filters them correctly.
-
Set Fallback Errors: Configure an error handler in Make or Zapier so if an API endpoint times out, the raw lead data is saved safely to a Google Sheet instead of being lost.
-
Monitor System Latency: Keep your total workflow execution time under 15 seconds to ensure instant speed-to-lead follow-ups.
Discover how to bundle no-code digital products and software assets in our guide to package sell digital templates micro saas.
Explore how to build stand-alone web software tools in how to build a no code micro saas app.




Leave feedback about this